Linux Foundation Certified System Administrator (LFCS) : Network (Part 3)
Assume that these 2 pc are connected with 192.168.1.0

so, if you ping for 192.168.1.11 from 192.168.1.0, you will get this

Which means 192.168.1.10 can access and contact with 192.168.1.11
But if you want to contact to something called, db

you can see error. Isn’t that logical? Where is the db?
Assume we want to set 192.168.1.11 as the db . So, we can add that to /etc/hosts path using cat

Now, we can ping for db and you can see smooth contact

So, we have done that for host 1 (192.168.1.10) . Now the issue is, we can set fake names to host IP addresses. For example, we can set the host 2 IP address to Google

DNS Server
To solve this issue, we can keep a different server (DNS Server) which will have all IP and host name. So, users can look into that table and understand which IP address is pinged

Now the question is how to connect our local hosts to the DNS server. For example, our DNS has IP of 192.168.1.100 here. We can add that to the /etc/resolv.conf file. We can give it the name “nameserver”.

We can now use any host name within the DNS server

Now assume we have another case. We have IP 192.168.1.115 and in our host we have set it as “test” server using cat » /etc/hosts

But in the DNS, there is another IP (192.168.1.116) which has the exact same name “test”
So, if we ping to “test” server, which IP will it refer?
To check that, we have cat /etc/nsswitch.conf
Here we can see host first looks into files and then looks into dns. Files means /etc/hosts path. It check what “test” server is associated with. If it does not find it there, it goes to dns server.
So, the answer would be. If we now ping for “test” server, we would be prompted to 192.168.1.115 despite having another IP in dns server. Reason is simple. It looked first the local path and as it found the “test” server there, it never looked “test” server at the dns.
Now, assume you want to ping for facebook.com but you failed as that name is not listed on the DNS server.

To solve this, add the public DNS server to your /etc/resolv.conf file . This public DNS has all of the server names online. or, the smarter move would be to set “Forward all” to public DNS in your local DNS.

Domain Names
In this way, you don’t need to add public dns to /etc/resolv.conf file
But wait again! why facebook.com instead of “facebook” server??

It’s domain name which is used to keep same things together. For example, .org for non profit organization, .com for companies.
For example,

Here, “.” is root, “.com” is top level domain.drive , mail etc are subdomain and you reach there by drive.google.com, mail.google.com
So, how it works? How it looks for desired server?

Firstly it looks for the server name (apps.google.com) in your local dns server (org dns) and then it moves to root dns (for “.”) , then .com dns server, then google’s dns and finds the IP address associated with it.
Took some time, right! Now it will save this IP in your local dns’s cache so that, next time it does not look for it from scratch.
What happens for your company website? What if your company have multiple subdomains?

Now, you can see the sub domains (nfs, web, mail etc.) are sub domains and you have saved their host name in your local dns server. To connect them, you can ping using those server names like ping web.mycompany.com
What if you want to access web.mycompany.com using just web? You then need to add search as mycompany.com in /etc/resolv.conf

Record types

Storing IPV4 is called A record, storing IPV6 is called AAAA , maping one name to another is called CNAME.
Note: Instead of ping, you can use dig, nslookup as well
CoreDNS
Now, we will see how to configure a host as a DNS server.
We are given a server dedicated as the DNS server and a set of IPs to configure as entries in the server. There are many DNS server solutions out there; in this lecture, we will focus on a particular one – CoreDNS.
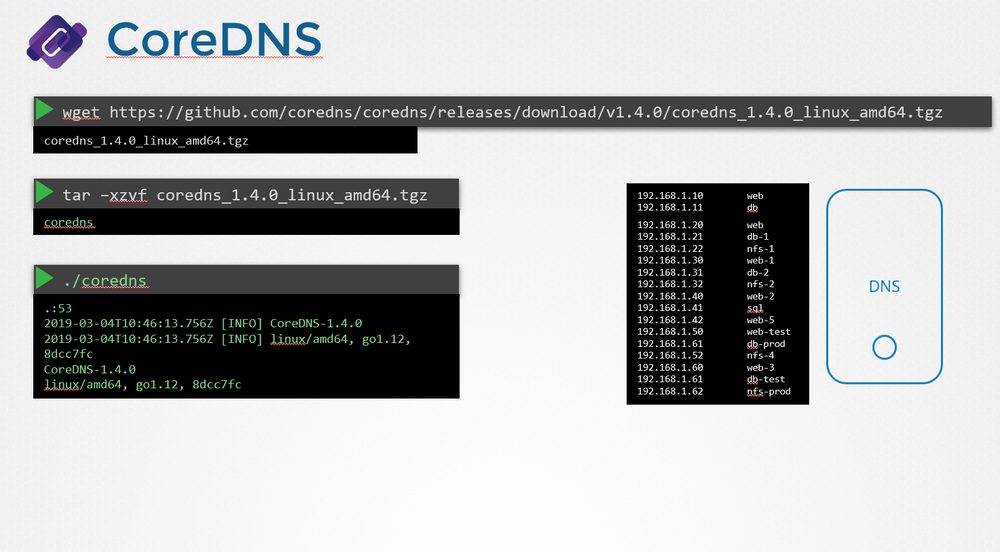
So, how do you get core DNS? CoreDNS binaries can be downloaded from their Github releases page or as a docker image. Let’s go the traditional route. Download the binary using curl or wget. And extract it. You get the coredns executable.
Run the executable to start a DNS server. It, by default, listens on port 53, which is the default port for a DNS server.
Now, we haven’t specified the IP to hostname mappings. For that, you need to provide some configurations. There are multiple ways to do that. We will look at one.
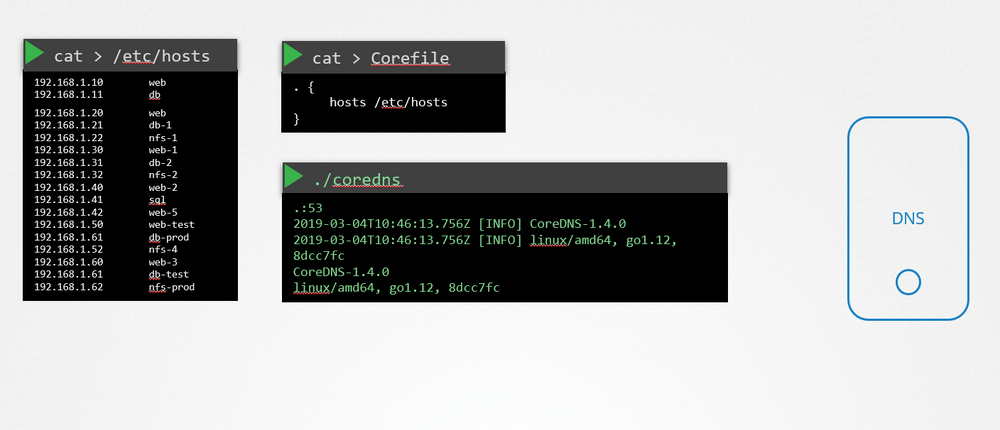
First, we put all of the entries into the DNS servers /etc/hosts file. Then, we configure CoreDNS to use that file. CoreDNS loads its configuration from a file named Corefile.
Here is a simple configuration that instructs CoreDNS to fetch the IP to hostname mappings from the file /etc/hosts. When the DNS server is run, it now picks the IPs and names from the /etc/hosts file on the server.
CoreDNS also supports other ways of configuring DNS entries through plugins. We will look at the plugin that it uses for Kubernetes in a later section.
Read more about CoreDNS here:
https://github.com/kubernetes/dns/blob/master/docs/specification.md
https://coredns.io/plugins/kubernetes/
Switching
To connect 2 PCs we use a switch which uses a physical/virtual connector called eth0 here

Assuming the switch have IP 192.168.1.0

Let’s appoint IP to the PCs using “ip addr add <IP for the pc> dev eth0”

So, within a particular system it can now contact each other and send packets.

Routing
Now, to contact other system, you need a router between these two systems

It also assigns IP addresses to these switches.

To make proper contacts, you need to specify a routing table now.
To connect the router to internet we can add default IP (0.0.0.0 → which means from anywhere) with our desired IP . For example, we want to add this to 192.168.2.1.
But, if we have 2 routers. One for internet access and one for company’s network connections, we need to deal with gateways.
Default Gateway

Here for example, you can see one router is connected to internet and therefore , we have added default IP to desired connection. For example, it’s 192.168.2.1
Again, we have another router to connect between 2 networks and thus we have added 192.168.1.0 with 192.168.2.2
Case study
Assume that you are to connect to a server called repository server using the link calestone-repos/ but you can see “The site can’t be reached”

Now what?
Let’s troubleshoot:
You will check if the network interface connected to your system is up or not

It’s up! Great
Now look for DNS connection. We can see that DNS is connected to our system as well

Finally, try to ping to the target server

You can see that 3 packets were sent but 0 were received.
Now, let’s see the route between our device and the target.

We can see we have 2 more routers in between and 2 are doing good. but our target one is having issue.
Remember, network interface (eth0 etc. ) are responsible to connect to router.
Let’s see if that network interface is actually up or not.

We can see the network interface down. so, let’s up that one.

Now, if we look for the server, we can easily connect

That’s it!!

